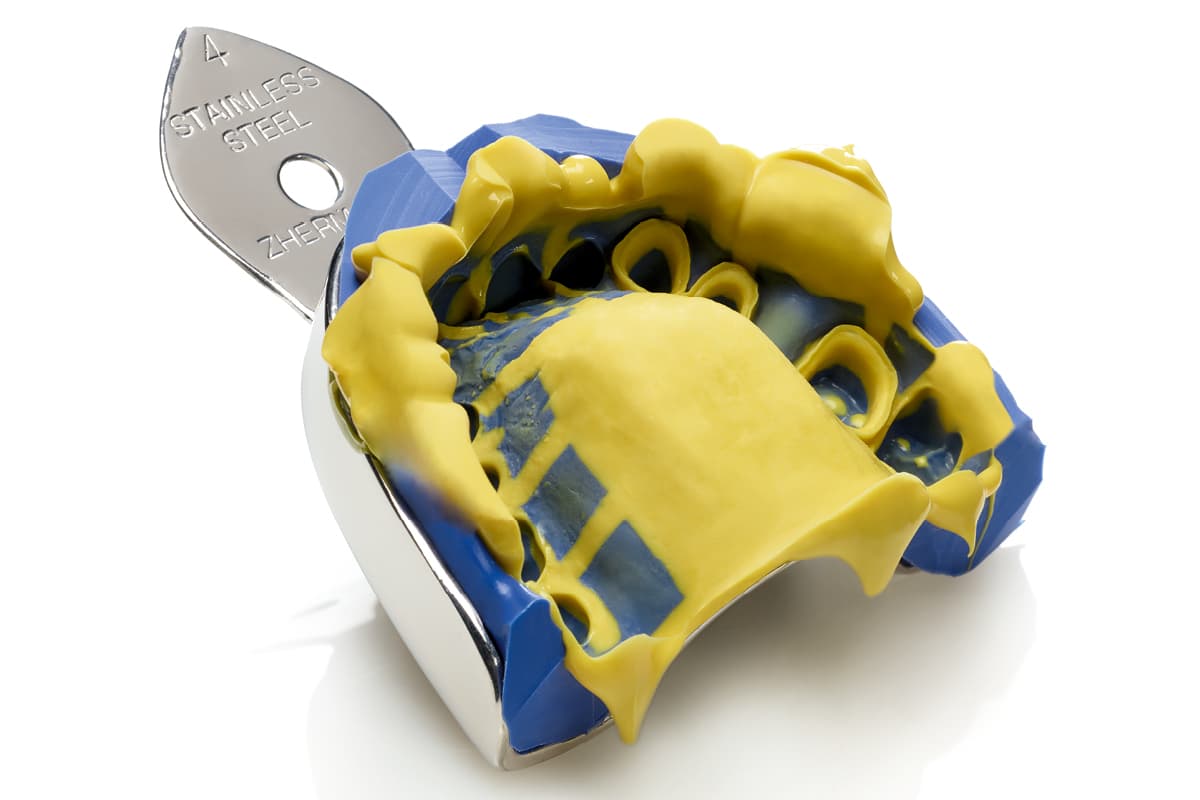
In fixed prosthetics, a perfect impression should be able to register the entire preparation area without any deformation, focusing particular attention on the margin, and ideally extend peripherally to the beyond-preparation area. (1)
Despite the increasing popularity of intraoral scanners, precision impressions with elastomers continue to dominate the market. (2,3)
Precision Impression Techniques: One Step and Two Step
Over time, various precision impression techniques (4) have become widespread, often divided into two macro-categories (5):
One-Step Techniques
In one-step techniques, the base and catalyst of the high-density material are mixed in the recommended doses and placed on the tray, while the low-density material is mixed at the same time and placed on the preparation margins and any areas where maximum precision is desired.
The tray loaded with high-density material is inserted into the patient’s mouth, which incorporates and pushes the lower-density material in a single operating sequence. (6)
Two-Step Techniques
In two-step techniques, a first impression is initially taken with high-density materials and then used as an individualised impression tray for the second impression.
In a second operational step, having verified the correct positioning of the first impression, a second impression is taken using a low-density material. (7)
In two-step techniques, there are two fundamental aspects to take into consideration:
- When making the second impression, it is essential that the first impression, loaded with the light body material, is repositioned correctly – even a minimal positioning error would inevitably lead to the presence of macroscopic errors.
- When making the second impression, it is essential to plan the right thicknesses, with the necessary space in the right areas, because the low-density material is able to offer maximum reproduction of detail, flow on the preparations, inside the grooves and even register the beyond-preparation area.
It is essential to manage the first impression so that it can be easily repositioned and offer the low-density material the right thicknesses where it is beneficial for it to go.
Methods used to create space for the light body
There are several methods used to obtain correct space for the light body. (8,9) Controlled wax thicknesses of 2 millimetres can be used during the first impression or, alternatively, the first impression can be taken using temporary implants in situ.
It is also common to use in the putty impression polyethylene sheets that act as spacers. This latter technique, however, creates a uniform space over the entire surface of the impression, while preventing the low-density material from going selectively where required, creating instead a thin layer of light body over the entire extension.
Trimming the Impression
Another option is to take the first impression as normal and then, once it is polymerised, to modify it for easy repositioning and achievement of the correct thicknesses for the light body material. This is then referred to as “trimming” the impression in the two-step technique. (10)
First and foremost, it is essential for the first impression to be completely polymerised before starting to manipulate it.
Impression Trimming Procedure
Initially, all undercuts should be removed that could prevent the passive and correct repositioning of the impression. (11) All undercuts present in both the prepared and the unprepared teeth need to be removed using a scalpel blade or bur. All interproximal areas between teeth will also be removed in this way. (1)
Subsequently, it is useful to make some relief grooves in the pre-impression to allow the excess low-viscosity material to flow away, thereby avoiding stress affecting or alterations being made to the thickness of the material.
These channels can be cut using specific instruments such as the Putty Cut (Zhermack), a kind of circular scalpel specially made for this purpose.
The channels or relief grooves must allow the low-viscosity material to flow from the abutment preparation areas or from where the maximum level of detail reproduction is desired to relief areas, such as the hard palate, which must be appropriately removed during the trimming phase.
Once all the undercuts have been carefully removed and the channels have been created, an attempt must be made to reposition the impression in the oral cavity. Once repositioning has been easily and passively achieved, it is recommended to mark a reference point on the putty of the first impression to facilitate subsequent repositioning of the impression tray.
References
- Feraru, M., Talmor, G., & Bichacho, N. Revisiting the channeled-putty/wash technique for predictable, flawless perfect impressions.
- Ting-shu Su. Sun Jian. Intra-oral digital impression technique: a Review. Journal of Prosthodontics 2014; 9.
- Seelbach P, Brueckel C, Wostmann B. Accuracy of digital and conventional impression techniques and workflow. Clinical Oral Investigations 2012; 10.
- T. E. Donovan and W. W. Chee, “A review of contemporary impression materials and techniques,” Dental Clinics of North America, vol. 48, no. 2, pp. 445–470, 2004.
- Radfar, S., Alikhasi, M., Khorshidi, S., Tohidkhah, S., Morvaridi Farimani, R., & Shahabi, S. (2023). Evaluation of One‐and Two‐Step Impression Techniques and Vertical Marginal Misfit in Fixed Prothesis. International Journal of Dentistry, 2023(1), 9898446.
- K. J. Anusavice, C. Shen, and H. R. Rawls, Phillips’ Science of Dental Materials, Elsevier Health Sciences, Amsterdam, Netherlands, 2012.
- W. W. Chee and T. E. Donovan, “Polyvinyl siloxane impression materials: a review of properties and techniques,” The Journal of Prosthetic Dentistry, vol. 68, no. 5, pp. 728–732, 1992.
- Nissan J, Gross M, Shifman A, Assif D. Effect of wash bulk on the accuracy of polyvinyl siloxane putty-wash impressions. Journal of Oral Rehabilitation 2002; 4: 357-361.
- Nissan J, Laufer BZ, Brosh T, Assif D. Accuracy of three polyvinyl siloxane putty-wash impression techniques. Journal of Prosthetic Dentistry 2000; 83: 161-165.
- Ender, A., Attin, T., & Mehl, A. (2016). In vivo precision of conventional and digital methods of obtaining complete-arch dental impressions. The Journal of prosthetic dentistry, 115(3), 313-320.
- Gherlone, E. (2017, April). L’impronta in protesi dentaria. Edra.
Would you like more information about Zhermack Dental products and solutions?
Contact us


 Zhermack SpA has been one of the most important producers and international distributors of alginates, gypsums and silicone compounds for the dental sector for over 40 years. It has also developed solutions for the industrial and wellbeing sectors.
Zhermack SpA - Via Bovazecchino, 100 - 45021 Badia Polesine (RO), Italy.


